
The views expressed on this website are mine alone and do not necessarily reflect the views of my employer.
Picturing the Perfect Image Proxy

Photo by Andrik Langfield on Unsplash
Motivation
Images can be one of the largest files that a user has to load on a website. Static images can be compressed at build time, but if you have users or staff uploading images you might need an image proxy.
There are image proxies that you can pay for like Cloudinary. Although these are easy to use, it can be easy to hit the limits of the free tier.
I used Cloudinary a bit for Extended Night Companion which is a mobile/web app that displays a collection of maps for the video game The Long Dark®.
Each map can be around a megabyte or more in their raw format. So it's really important to compress those to save the users data and for performance.
I might have added some new images and forgotten to add the Cloudinary configuration to compress them 😅
You can see the results of that mistake in the graph below.
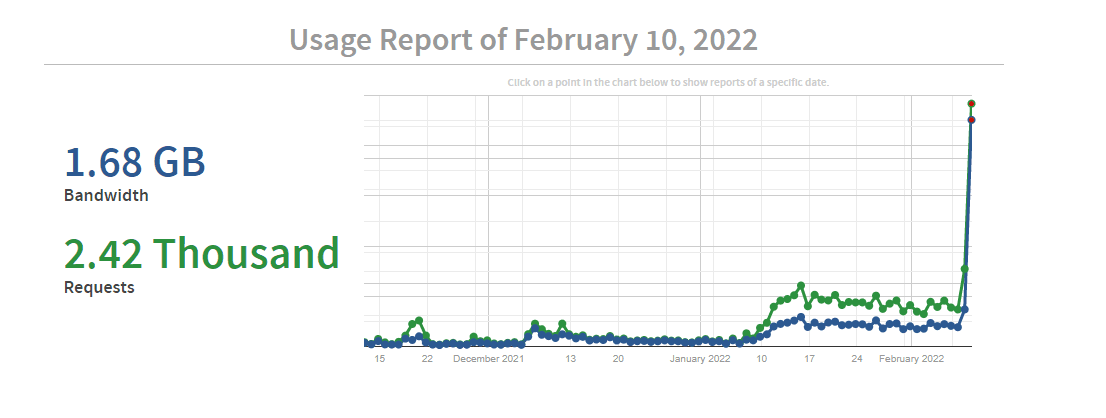
Eating through bandwidth isn't a huge deal normally, but Cloudinary's free tier has limited bandwidth. It's a little unclear when they would turn off access to the my images for exceeding my limits, but it makes me uneasy not knowing.
Extended Night Companion is truly a small side project with a small amount of users, but anytime it has gone down, I immediately get emails or 1 star reviews complaining that it is broken 🥲. I'm also cheap! I don't want to pay for a service as if I'm a small business for a side project
Extended Night Companion is one example, but I'd like to have an image proxy on every project. Having the flexibility of transforming images on the fly makes development a lot easier and gives users a better experience.
So I am looking for an image proxy that is
- Cheap
- Easy to Use
- Easy to Host
imgproxy
imgproxy is an image…proxy 🙄.
It's open source, self-hostable, and has great documentation.
So how would it work?
Here is an example of a URL you might use in an img element
https://images.brooksbecton.dev/yzeAttby0UA5p0KgMj7rgsFxKGmR6x0snISQZFaT_uI/format:webp/rs:fit:1000/plain/https://images.unsplash.com/photo-1583753075968-1236ccb83c66
Let's break down this URL a bit
I'm hosting imgproxy at
https://images.brooksbecton.dev/
The next part is a “signature” that we will talk about later
yzeAttby0UA5p0KgMj7rgsFxKGmR6x0snISQZFaT_uI
Then the transformations we want
format:webp/rs:fit:1000/plain/
Lastly, the URL to the image we want to work with:
https://images.unsplash.com/photo-1583753075968-1236ccb83c66
Neat! So you basically have a website you can send URLs and ask to transform. If I want to transform a different image, I can change the image url at the end. Let's try it!
Here's another image:
https://images.unsplash.com/photo-1604762524889-3e2fcc145683
Here's the exact same imgproxy URL with the new image URL replaced at the end
https://images.brooksbecton.dev/yzeAttby0UA5p0KgMj7rgsFxKGmR6x0snISQZFaT_uI/format:webp/rs:fit:1000/plain/https://images.unsplash.com/photo-1604762524889-3e2fcc145683
You won't guess what this new proxied image looks like!!
Forbidden…🥲
Remember that signature?
Every time you make a URL pointed at imgproxy you'll need to recalculate the “signature.”
A signature is a hash of the image URL, the transformations, a secret key🤫, and a secret salt 🧂.
This keeps people from using your imgproxy for themselves while you pay the bills.
On each request, imgproxy
- Looks at the url and transformations
- Creates a signature from them
- Compares the signature it created with the one in the request
- Returns FORBIDDEN 🙅, if they don't match
How to host imgproxy
First, you will need to decide where you would like to host your instance of imgproxy.
There are a few options
- Docker
- Helm
- Heroku
- Typical Operating Systems
This easiest option for me would be Heroku, but Heroku no longer offers free tier 😞.
I could learn how to use Docker…again, but

Hosting on Railway
railway.app is a newer hosting service that offers a little bit of resources for free accounts.
After that, you can be charged based on usage. So I went with Railway!
You'll need to
- Fork the imgproxy repo on Github
- Sign into Railway
- Create a project
- Open your new project
- Click the “New” button in the top right
- Create a new project from a Github repo
- Select your forked repository of imgproxy
- Watch the deploy crash and burn 🔥

imgproxy needs a few environment variables set in order to run.
We'll need to generate a key and salt to generate and check signatures.
imgproxy has a bash script you can use to generate a random key and salt value here
How to generate a random key and salt
Also, the Dockerfile isn't where Railway expects it. We will need to use the environment variable RAILWAY_DOCKERFILE_PATH to tell Railway where to find it.
IMGPROXY_KEY=
IMGPROXY_SALT=
RAILWAY_DOCKERFILE_PATH=docker/Dockerfile
In Railway, click on the app you just made, go to the “Variables” tab, and insert the environment variables.
NOW watch the the deploy succeed ✅
Generating URLs
The server is out there, ready to receive image requests!
Remember that the salt and key are what makes your imgproxy requests secure. These things should not be included in any client side code. Generating imgproxy URLs should happen on the server!
To generate URLs with JavaScript, the easiest option is to use the npm package imgproxy. The API for this package is easy to use. One caveat though is that you can run into issues, depending on the hosting environment your server ends up on. I ran into issues using this package while hosting on Netlify. I think it has something to do with the serverless environment it runs in, but I'm not too sure.
There are also a lot of well made examples on the imgproxy repo imgproxy URL generation examples
Here is an example of what a really basic createImageUrl function might look like based on the JavaScript Signature Example
export function createImageUrl({
  url,
  height,
  width,
}: {
  url: string
  width?: number
  height?: number
}) {
  const KEY = PRIVATE_IMAGE_PROXY_KEY
  const SALT = PRIVATE_IMAGE_PROXY_SALT

  const urlSafeBase64 = (str: Buffer) => {
    return Buffer.from(str)
      .toString('base64')
      .replace(/=/g, '')
      .replace(/\+/g, '-')
      .replace(/\//g, '_')
  }

  const hexDecode = (hex: string) => Buffer.from(hex, 'hex')

  const sign = (salt: string, target: string, secret: string) => {
    const hmac = createHmac('sha256', hexDecode(secret))
    hmac.update(hexDecode(salt))
    hmac.update(target)
    return urlSafeBase64(hmac.digest())
  }
  const host = PRIVATE_IMAGE_PROXY_URL
  const path = `/format:webp/rs:fill:${width}${height}/plain/${url}`
  const signature = sign(SALT, path, KEY)
  const result = `${host}/${signature}${path}`

  return result
}
Next Steps
CDN
You should put a CDN in front of your image proxy server. That's right! imgproxy doesn't cache transformations between requests. It only sends back a cache header for a user to cache on their device.
As an example
- User A makes a request for your home page's hero image with some transformations
- imgproxy receives the request
- imgproxy makes the transformation for the hero image
- User A receives and caches the image on their device
- User B makes a request for the same image with the same transformations
- imgproxy receives the request
- imgproxy makes the transformation for the hero image
- User B receives and caches the image on their device
Device caching can be okay depending on your app. Something like a social media app would benefit a lot from a CDN because user's will be requesting the same images. If your app's users mostly view their own images, they could still benefit, but it's not as big of a deal.